
Context
Most traders take a good signal in the wrong market phase. Context is a market context indicator for TradingView designed to fix exactly that - the decision layer that reads higher-timeframe structure and tells ZynAlgo TrendLine how to trade it.
Key benefits
- One clear read of the market - four phases - Pullback, Expansion, Reversal, Range - each mapped directly to the TrendLine Mode to run.
- Settings chosen for you - Sensitivity, Stability and Follow Trend are recommended per phase, so you stop guessing at configuration.
- A built-in risk filter - the Avoid line names the specific mistake to skip in the current phase, even when a signal appears.
- A steadier bias - inertia and hold rules stop the read flipping on every convincing-looking candle.
- Higher-timeframe awareness on one chart - the phase is read from a higher context timeframe on closed bars, so it does not repaint.
How it works
Every bar is scored across EMA structure, ATR volatility, daily bias, range detection, structure breaks and sweeps, RSI rhythm, ADX decay, volume and session. The full breakdown is in the Manual.
What's included
TradingView indicator (Pine v6 overlay): dashboard, on-chart mode and bias labels, range boundary lines, mode-change alert. Access granted to your TradingView username. Pairs with ZynAlgo TrendLine, sold separately.
Best for
Intraday forex, gold, indices and crypto on M1 to H1; TrendLine users and traders who already have an entry method.
Browse the ZynAlgo marketplace
Trading involves risk; this indicator provides market context only and is not financial advice.
Context
Context is the decision layer for ZynAlgo TrendLine on TradingView. It reads market conditions and tells you how to configure TrendLine - it does not generate BUY/SELL signals itself.
Why Context focuses on market conditions before entries
Most indicators try to tell you when to enter. Context does something different, and it is built to work as one half of a pair. ZynAlgo TrendLine generates the BUY and SELL signals; Context tells you what kind of market those signals are appearing in, and how TrendLine should be configured to suit it.
Two layers, two jobs:
- Context - the decision layer. Reads higher-timeframe structure, identifies the market phase, and recommends the TrendLine Mode, Sensitivity, Stability and Follow Trend to run.
- TrendLine - the execution layer. Applies those settings on your trading timeframe and plots the actual entry, stop loss and take-profit levels.
You do not need Context to run TrendLine. What Context adds is filtering: it keeps you from taking a good signal in a market phase that does not support it.
To reach that verdict, Context reads on every bar:
- EMA structure and slope (20 / 50 / 200) - trend alignment and direction
- ATR (14) against its own average - volatility expanding or contracting
- Daily higher-timeframe bias - the D1 EMA stack, slope and price position
- Range regimes - daily inside-bar ranges and 24-bar compression ranges
- Swing structure - pivot highs and lows, liquidity sweeps, break of structure
- RSI rhythm - a 9-EMA against a 45-WMA of RSI(14)
- ADX (14) momentum decay and volume relative to its 20-bar average
- Trading session - Sydney, Asia, London, New York
All of it is compressed into one dashboard answer: the phase you are in, the phase most likely next, the TrendLine settings to use, and what to avoid while the current phase holds.
The Role of the Context
Every setup has an environment where it works and an environment where it quietly bleeds. A pullback entry taken inside a dead range fails for the same reason a breakout entry taken into an exhausted trend fails - the setup was fine, the context was wrong. The Context is this indicator's single verdict about that environment, and it maps one-to-one onto the TrendLine Mode you should be running.
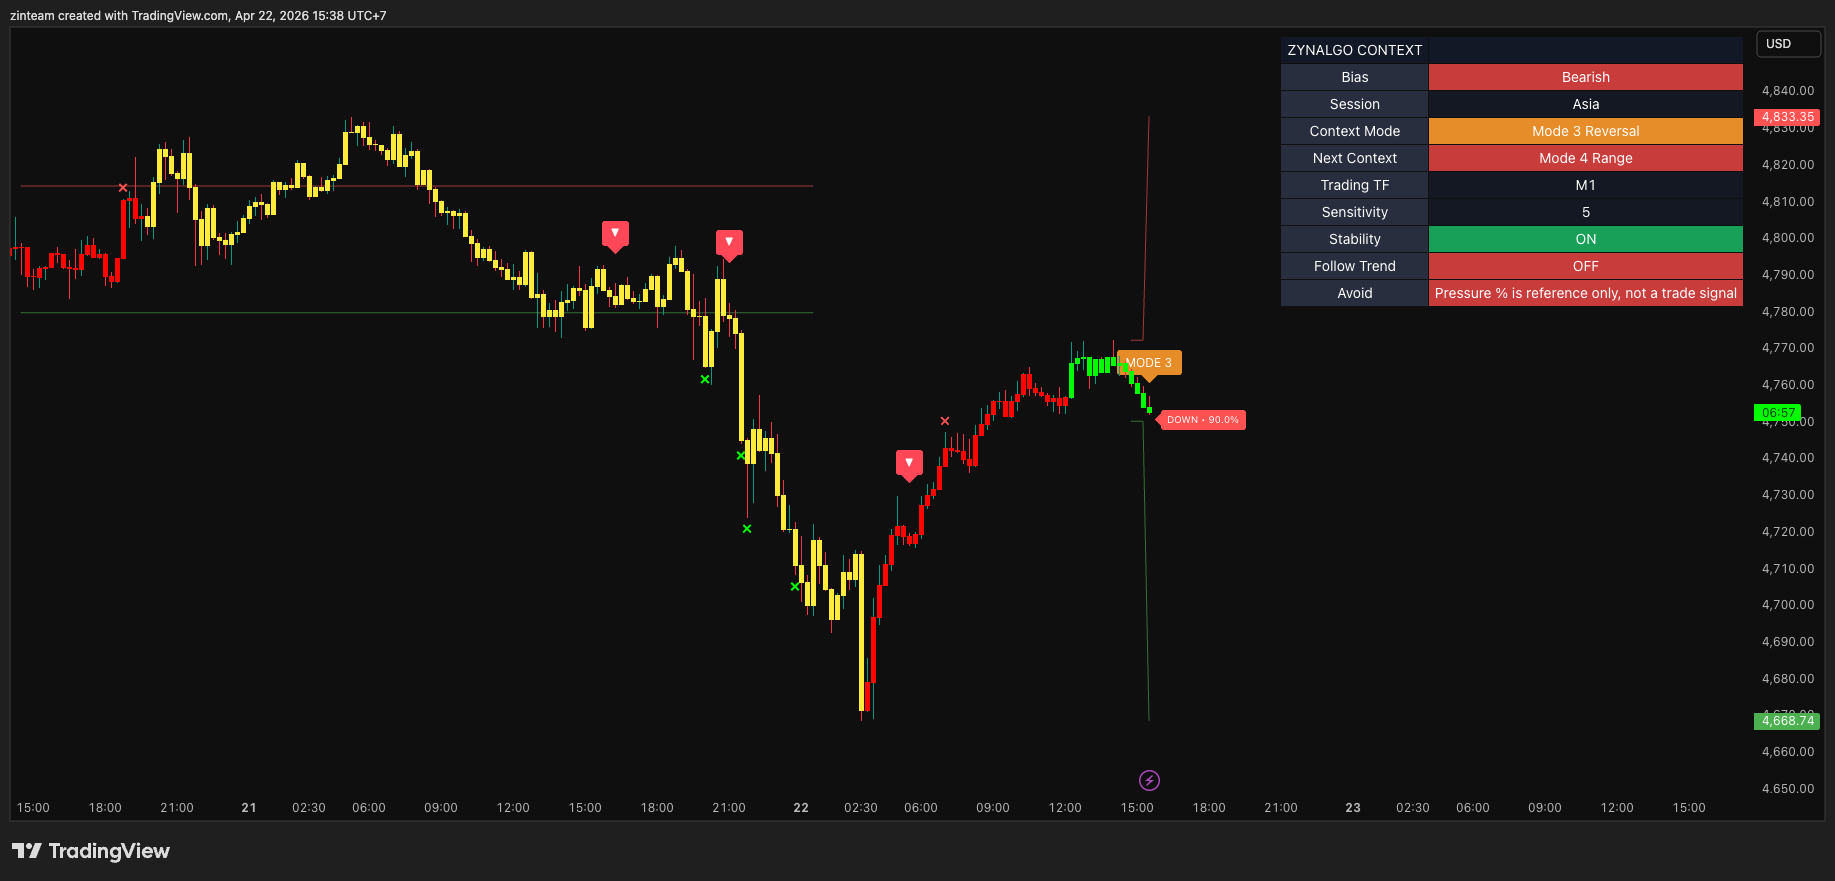
There are four modes, and each one points at a matching TrendLine Mode:
- Mode 1 - Pullback -> TrendLine Mode 1. The market is trending and price is temporarily retracing before resuming. Enter on pullbacks within the trend.
- Mode 2 - Expansion -> TrendLine Mode 2. A strong, directional phase with momentum. Follow the trending direction; do not fade it.
- Mode 3 - Reversal -> TrendLine Mode 3. Structure is changing direction. Watch for momentum-based reversals rather than continuation.
- Mode 4 - Range -> TrendLine Mode 4. No clear trend; price oscillates between boundaries. Trade the edges, not the middle.
The most costly mistake users make is failing to update TrendLine when Context changes - running Mode 4 settings while Context has moved to Mode 2, or the reverse. The second most costly is bias-flipping: rewriting your read of the market every time one candle looks convincing. Context deliberately resists that second one. Each mode carries an inertia bonus and a minimum hold in bars, and a challenger mode must beat the incumbent by a clear score gap before the label changes. While price sits inside a confirmed range in Mode 4, switching is blocked outright unless a real breakout is forming. In quiet volatility the gap required to switch widens; when volatility spikes, the hold period is halved so the read can react.
How the Context is defined
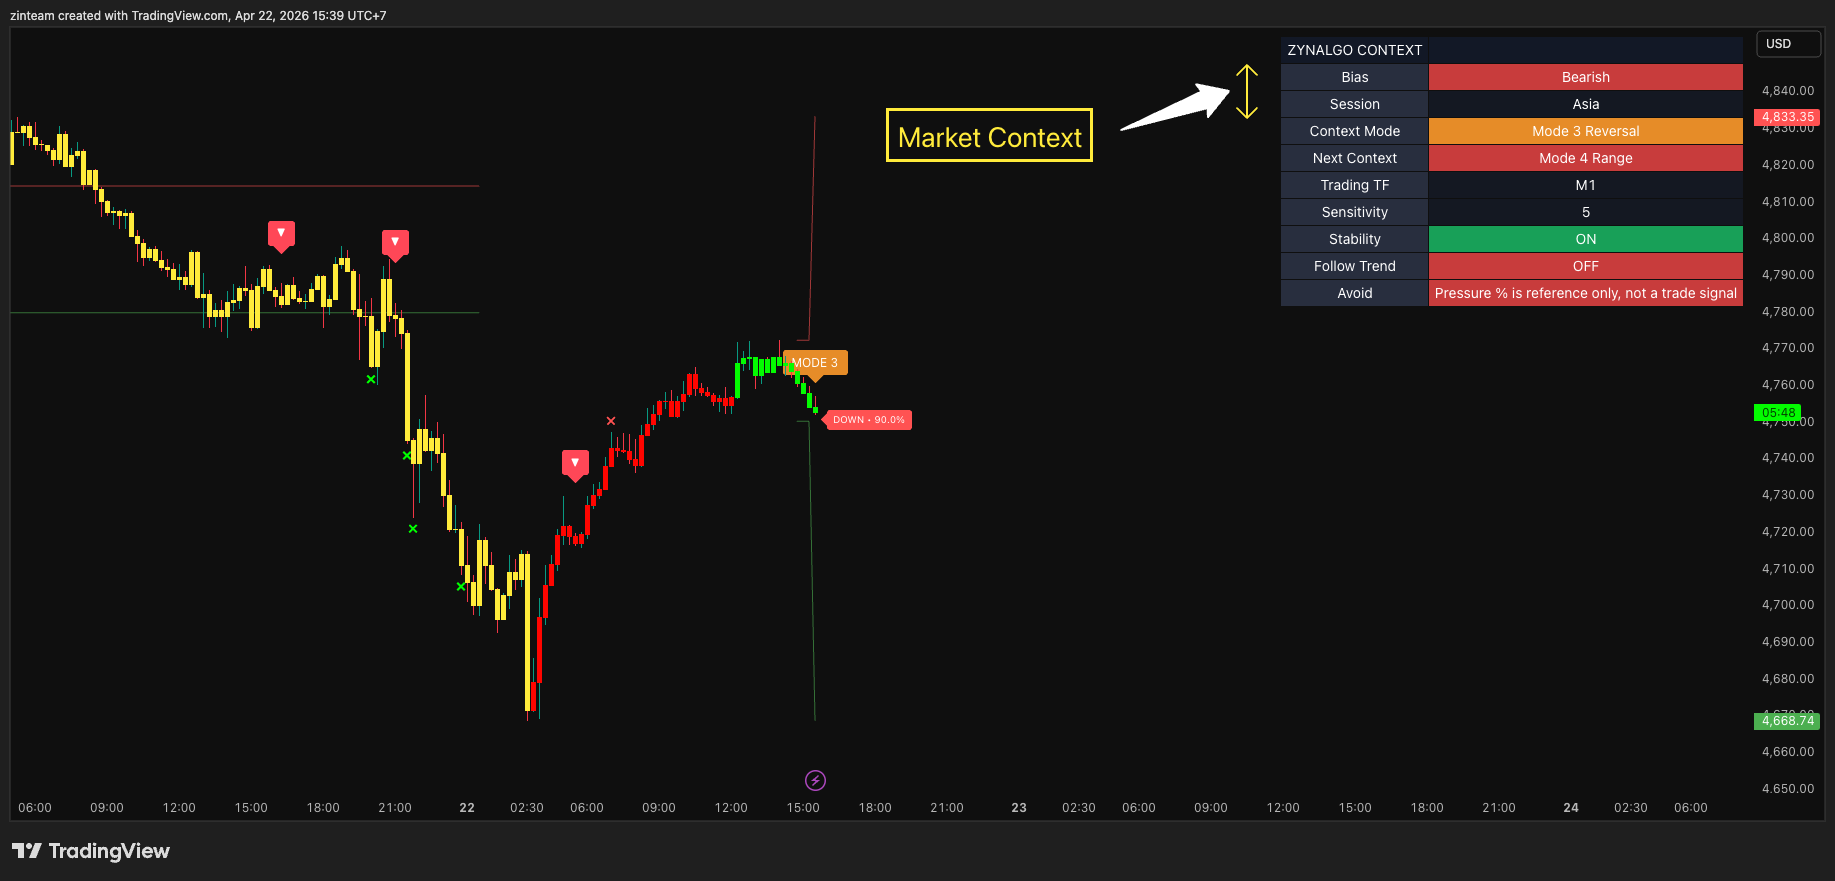
Every bar, all four modes are scored from the same evidence, and the scores are smoothed over three bars before a winner is picked. The components and their roles:
- EMA 20 / 50 / 200 stack and slope - establishes trend structure; feeds Mode 1 and penalises Mode 4
- ATR (14) vs its 14-period average - rising or high volatility rewards Mode 2, low volatility rewards Mode 4
- Daily HTF bias - agreement with the D1 stack, slope and price position adds weight to Mode 1 and Mode 2
- Range detection - a daily inside bar (using the mother bar's high and low) and a 24-bar range no wider than four ATRs; both need confirmation bars before a range is treated as active
- Break of structure - a close beyond the last pivot with a body of at least half the candle and a range of at least one ATR
- Liquidity sweep - a wick beyond a prior pivot that closes back inside, sized against ATR
- RSI rhythm - EMA(9) against WMA(45) of RSI(14); a tight spread is read as chop and penalises Mode 3
- ADX (14) decay - an extended trend with a falling ADX reduces Mode 2, flagging late momentum
- Relative volume - volume above its 20-bar average supports breakout scoring
- Session layer - Asia and Sydney add weight to Mode 4 in quiet conditions, London to Mode 3, New York to Mode 2
Set the Trading Timeframe input to the timeframe you actually execute on. Context derives the higher context timeframe from it automatically (M1 -> M15, M5 -> H1, M15 -> H4, H1 -> D1) and reads the mode from a closed bar on that timeframe, so the displayed reading does not repaint.
Entry rules with Context
Context does not print entry signals - there is no buy arrow and no sell arrow in this indicator, by design. TrendLine produces the signal; Context decides whether that signal is worth taking and how TrendLine should be tuned. Read the dashboard top to bottom before you act.
- Bias - Bullish, Bearish or Neutral. In a Bullish read, prioritise BUY signals and skip SELL setups; in a Bearish read, the reverse. Neutral means no clear edge: reduce size or wait for clarity.
- Session - Sydney, Asia, London, New York or Off Session. Asia tends to range, London initiates trends, New York continues them or reverses late. The session is already factored into the scoring.
- Context - the current phase, and the TrendLine Mode to switch to. When it changes, update TrendLine immediately.
- Next Context - the strongest mode that is not currently active. Treat it as preparation, not a prediction: wait for Context to actually change before switching TrendLine.
- Trading TF / Sensitivity / Stability / Follow Trend - the execution profile for the current phase. Apply these to TrendLine rather than using generic defaults. Follow Trend reads ON in Mode 1 and Mode 2, and OFF in Mode 3 and Mode 4.
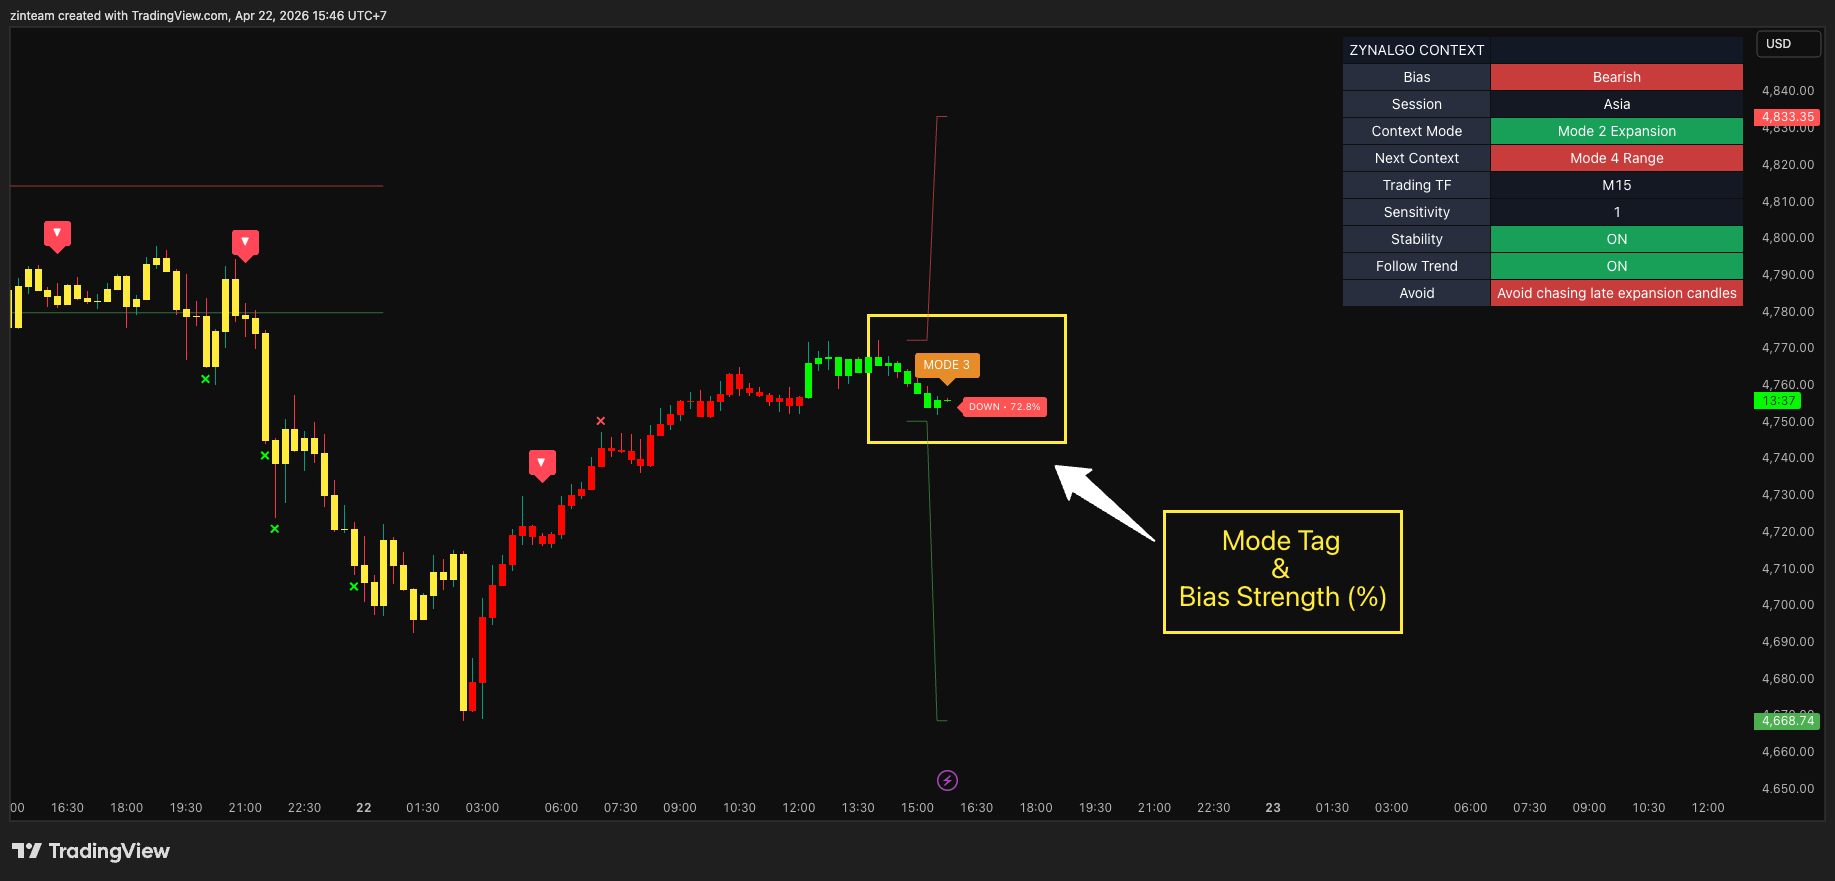
- Avoid - the risk filter, and the single most valuable line on the dashboard. If an Avoid warning applies to where price is right now, skip the TrendLine signal or cut your size - do not enter early before a pullback confirms (Mode 1), do not chase late expansion candles (Mode 2), treat the bias percentage as reference only (Mode 3), do not trade the middle of the range (Mode 4).
On the chart, whenever a range regime is live the active range high and low are plotted - red above, green below. Near the lower boundary in Mode 4, look for a BUY from TrendLine; near the upper boundary, look for a SELL. In the middle, there is no directional edge and the Avoid warning will usually be showing. A confirmed close outside a boundary signals a structure shift - watch Next Context rather than fading the break. A "Context TF Mode Changed" alert is also available and fires when the higher-timeframe mode flips on a closed bar.
The working sequence, every session:
- Add Context and set the Trading Timeframe to your execution timeframe.
- Read the whole dashboard - Bias, Session, Context.
- Check the Avoid warning before touching anything else.
- Apply the recommended Mode, Sensitivity, Stability and Follow Trend to TrendLine.
- Check the bias strength reading and where price sits between the boundaries.
- Wait for a TrendLine signal that agrees with the Context bias.
- Let TrendLine manage the trade, and reassess if Context changes mid-position.
The bias strength percentage shows how strong the current structure is, not when to enter. A high reading is never an entry on its own - always wait for the TrendLine signal.
Is Context right for you?
Context is built for traders who already know how to enter, but keep entering in the wrong weather:
- ZynAlgo TrendLine users who want their Mode and settings chosen by market structure instead of guesswork
- Intraday traders on M1, M5, M15 or H1 who want a stable higher-timeframe read without opening a second chart
- Discretionary and semi-systematic traders with a working entry method that underperforms in the wrong phase
- Traders who work across Asia, London and New York and want session behaviour built into the read
- Any TradingView symbol - forex, gold, indices, crypto and commodities; the logic is pure price structure
It is not the right tool if what you want is a standalone buy and sell signal generator - Context deliberately does not produce one, and no indicator can remove the risk from a trade.
The market only offers a few kinds of opportunity at any one time. Knowing which one is actually on the table is what stops you forcing the other three.
- Context v1Aug 13, 2026

Why your trend entries fail when market phase changes
You take a clean pullback entry in an uptrend, then price chops sideways and stops you out. The setup was valid; the phase was wrong. Learn how reading market context before entering prevents signal-context mismatch.
Why Your Best Entry Setups Work One Day and Fail the Next
The same pullback entry that printed profit yesterday gets stopped out this morning. This article explains why market phase changes turn good setups into losses, and how Context NT8 reads structure to help you trade the conditions you actually have.